Monday, April 6, 2015

Family Mini Album


I have a large family (that just keeps growing!!). I have been very lucky that almost all if us live in the same city. My oldest brother has lived far away for almost 15 years so when he was home for a visit before him and his family moved to S Korea, we had family photos done. I used to be the photographer, but I fired my family because they are stressful to photograph (especially the group shot!). Mom got a photographer and this was the result. 
I used a little 4x6 album. I love how these look and it makes it pretty easy to make the album quick. I painted a wood frame with sparkle paint then covered in glossy accents. A Michaels camera with Basic Grey letter stickers and grey satin ribbon stamped with script finishes off the cover.

  The first page is vellum with Family cut out with the Silhouette. Some enamel dots and sequins make this quick and easy. 

This is a whole group shot. There are now 21 of us (soon to be 22) and I tried to have a camera motif throughout.This one has an enamel dot and crochet twine. Most of the papers are either Teresa Collins or My Minds Eye. I cut around the doily design on the paper 

Silver is also seen throughout the book with thread and paper punched in hearts and stars. Used my small hexagon punch and some Heidi Swapp words for this one and some hand sewing. 

A Silhouette die cut and glossy accents makes a great title. Flowers, pearls and enamel dots. I also love making my own confetti with tools I have one hand (often my cropadile!) 

Two pretty simple pages. I used the negative space of the border punch to balance the butterflies. 

I do love these Teresa Collins doilies on the paper. Cut out or left, they are adorable. Another couple of Silhouette titles, pearls, punches and enamel dots. 

I found the giant chain mail 7 on the ground many years ago and kept it for the original 7 of my family (I am constantly picking up 'junk' I can use) and it was perfect for a page of my parents and siblings. On the bottom page, I cut the pocket down and only used the picture because it is one of my favorites of all... My mom with some of her grandkids. 

The other running pics on the back. Quick and easy of my mom, sis and I with a giant Heidi Swapp glitter title

Stamping, rub ons, punches, washi tape, and fussy cutting. Another Silhouette title.  

Again, super simple pages with some confetti and fussy cutting. I printed the top title right on the patterned paper. 

Used a stamp to make my own patterned paper for the banner. Layers and layers here. Lots of glossy accents for dimension & Shine. 

And the last pages have layers,punches, confetti, silhouette titles, enamel dots and splatter. I cant even begin to tell you how much I love this little book. Definitely something you could make in an afternoon!!  If you have any questions about products or techniques, feel free to ask!!  Thanks for stopping by! 

Monday, January 12, 2015

Let's Make this Together

So I made this album with the intention of teaching a class and I love how it turned out!  The class will be 4 hours and HOPEFULLY we can make it through tis adorable stand up book. While mine has no pics yet, it is my goal to make it a gratitude book with lots of room for journaling. Most of the product is Teresa Collins Stationary Noted. 
  
   
The book is 6x8 and the Michaels frame perfectly fit around this 3x4 quote card. Lots of banner strips and ribbon and just a little bit of stamping. 

 I love the Fixars hexagon punch and the silver sparkle paper!!
 The hardest part for me was remembering to 
    to make the backside upside down! A pull out journaling card and just a 3x4 card banner cut. 
 This interactive page folds out for 6 pictures!!

 Fringe is always adorable! And I love the quote 
   labels and all the different shapes. 

 A fun shaker page. Would be cute with the photo behind the shaker... Hmmm. I think I can see some deconstruction in my future. 

 I love how quick and easy a photo stack is!!

 This book is full of different sized pages for interest. Also lots of dimension with the embossed paper, bakers twine, punches, and foam dots. 

 Lots of circles!!  I love this page and the sequins

 I  feel like this book could be used for anything!

That is not all the pages but enough to give you an idea. If you live in the Red Deer area and want to come create with us, let me know!  We would love to have you!!


Friday, April 4, 2014

Just a Quick Card


Enjoy!!
So I made this quick card for my friend for her birthday and I love it. I found the stamp at Micheals and didnt know what I would ever do with it but I just lived it so had to buy it (it was in the 1.50 bin so I felt I could splurge). I used Copics to color the dog and Michaels 1.50 letter stamps for the sentiment and a Heidi Swapp stamp for 'fabulous' and a star brad. So quick and easy but I think it is so cute. 

Enjoy!!

Thursday, March 13, 2014

Journal 52- Week 2

I have really been enjoying all the work that the people have been sharing on the Project52 board.  It has been good to get back to my artistic roots.  I have loved my years scrapbooking but it has been fun to do some other art work.

So here are a few of the art journal pages I have done over the last 2.5 months.  I still have 2 to catch up on because I am not feeling inspired by them yet (and life was a little busy those couple of weeks.) Excuse the bad cell phone pics...they are all shot at around midnight when I complete the project so lighting is awful!


This was was for Abstract Art.  I used a craft knife and acrylic paint with some texture paste under it on on canvas paper.  Was the first time ever doing this and I think that I like it...


This one caused me much stress.  I have not painted in many years so when I made the choice to watercolor for this challenge I wanted to pull out my hair because it was more difficult that I remember!  But in the end I was happy with the result.  Not professional quality, but one that makes me wish I was at that wishing well.
s


I am obsessed with Frozen so when the challenge was about Character, that is what I jumped to.  A quick sketch inspiration taken from another artist on the internet.  Just ink and some pencil crayon.


And this weeks challenge was Art for a Cause and my heart is heavy for Human Slavery and Trafficking.  There is an organization called End It that I took inspiration from but instead of the x on my hand, I put it across my page.  Photos are taken from the internet so I have no legal rights there, it was simply a personal art piece to speak against sex trafficking.

So there is a glimpse at some of my art journal pieces.  I hope you enjoy and are inspired to be creative yourself!

A couple of layouts

So my blogging once a week has been kind of a fail, but here are a couple of other layouts that I have been working on.

 I LOVE THIS PAGE!  It is just white cardstock and washi tape but it has such punch and focus on the quirmy worm that is my niece who does not look at the camera.  But I love this pic anyway.  I made the feathers by covering the wire with washi tape and then fringing the sides.  I dyed the seam binding ribbon with the same dye ink as the Heidi Swapp star stamps by pressing the stamp pad into the craft mat and adding a little water then smooshing the ribbon into the color.  Now I can have perfectly matched ribbon!  The tiny star glitter is actually clearance nail glitter from Claires.  I got a whole container for 1.00 and it will last me forever.  I love what it adds to pages (I have used it on soooo many pages recently because I love it.  Look for more of it on my pages being published in Canadian Scrapbooker magazine in the summer).  I would even love to frame this page for my wall that is how much I love this page and this little girl!!

This page is a show of my humor and lack of humility!  One day at work I may have had an "Incident" that has never happened before.  I shared the experience with my coworker (and had her laughing til tears were running down her face) and recently she sent me this pin on pinterest.  I just knew I had to use it to document this story.  I was inspired my Wilna Furstenburg from TwoPeasInABucket where she used rub ons and watercolor.  While I loved the way it looked, I also thought it was appropriate and fit the incident.  There is hidden journalling only because it didnt all fit in the corner.  The rubons are really old ones and for some reason I hoard rub ons so I like Wilna's idea of using them all on one page.  I didnt use them all from this sheet, but I definitely put a dent in it!


Hope that these can be inspiring in some way.  I will try to keep adding some new moments and layouts as I can.  Life seems to be so fast paced that I may not get as much posted as I would like.

Sunday, January 26, 2014

Our adventure in Selfies

So we took millions of pictures on a recent 3 week adventure in Europe.  I wanted to make a quick book of our trip but with so many pics it was hard to decide what to do.  My mom and I took selfie pictures at each of the the places we went to.  I primarily used Teresa Collins Far and Away line as the foundation but alot of other additives as well.


The first page of the book is simply documenting what the book is about.  Mostly just Teresa Collins paper and cut outs.  Some Ranger liquid enamels made my own enamel dots.  Glossy accents and gold thread also used.  The next page is us on the plane.  Wrote out a bit of an itinerary.  Date stamp from office supplies store and again Teresa Collins 6x6 paper pad and cut outs from that.  Each page has the edges double inked: first with a Navy Blue Basic Grey ink and then again with Black Soot Distress Ink by Tim Holtz.


 Our first couple of days were spent in London.  I cut the 6x6 paper to make the Union Jack.  I needed to use some acrylic paint to separate the colors.  Thicker sparkle letter stickers and Basic Grey letter stickers.  Each page also has the place highlighted with a Studio G letter stamp set (1.50 for an entire alphabet!!) And some hand stitching around the edge with gold thread.


The second page is also the 6x6 pad cut apart but also has the clock sticker from the sticker sheet.  Some block alpha stickers and Martha Stewart sparkle photo corners.  It was such a great day!!


.


Then we were off to Paris and we didnt get a selfie in front of the Eiffel Tower.  But here is Sacre Coeur! What I love about this page is the use of glossy accents!  It isnt as noticable in the picture but I used some gold PearlFx on the black letter, chipboard and the Fleur de Lis then covered it in glossy accent.  Makes the gold seem like it is floating.


And Halloween in Disney Paris!!  Awesome!  More Teresa Collins, Basic Grey small letters and Martha Steward( punches: web corner, and bats and the sparkle corner)  Took one of the photo corners and punched a Jenni Bowlin label punch. Also a little black Color Shine splattered.

Then off to Venice. There is a page of us at St Marks but due to its design it was tough to photograph.  The only new thing on this page is I distressed the edges of the paper with the Prima distress tool (really love that tool)  Red glitter stickers are by Doodlebug (I think!) Gold Lame Color Shine splattered in the Ranger Liquid Enamel.


I used the same PearlFx technique on the Milan letters.  The began as Basic Grey chipboard in bright green.  The were altered to be black, gold and glossy accents.  Also used some gold glitter paper as a photo mat.


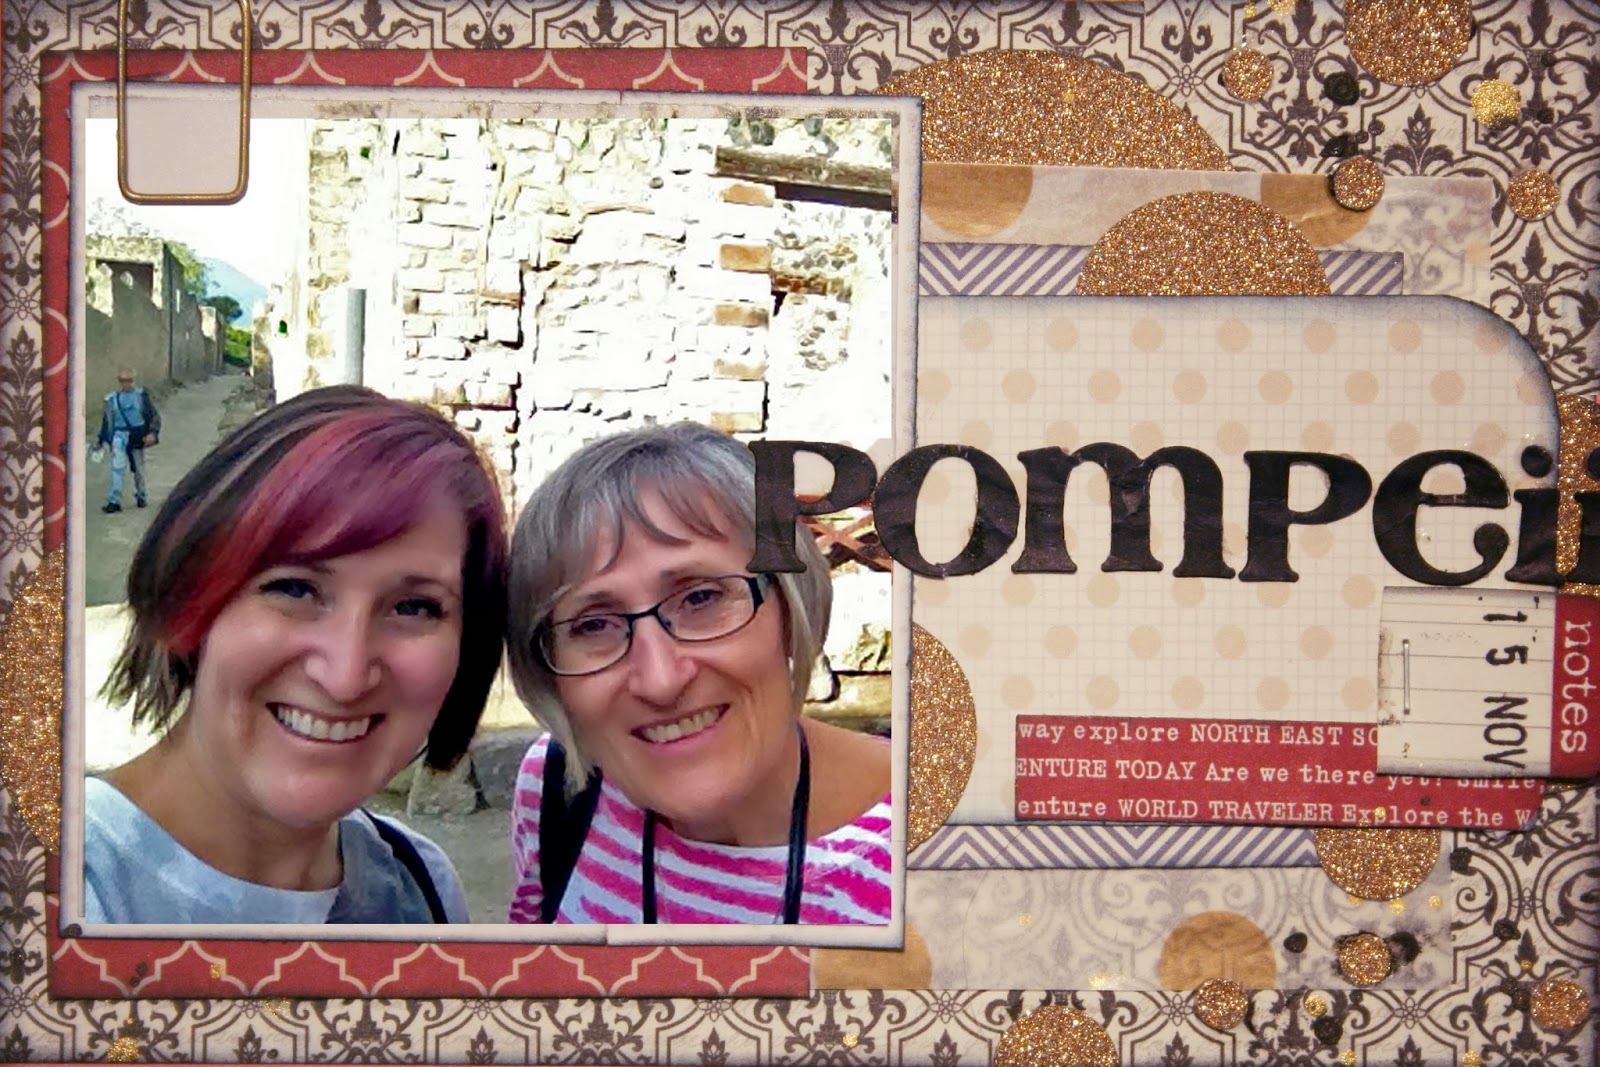
We took ALOT of selfies in Rome.  The circles are gold glitter duct tape from the dollar store with a 1.5 circle punch.  Some Studio Calico wood veneer stars, Basic Grey letter stickers and Gold Lame Color Shine splatter.


Trevi Fountain has more Teresa Collins cut apart 6x6 paper and a chip board sticker.  Used some gold sequins and a little gold thread hand sewing. Basic Grey letter stickers again because I love the size and the way that they look on the page.

We are off on the cruise portion of the trip.  The photo of this page is over exposed, but lots of banner stickers and paper at the top, cut out words that match the cruise themes, and gold glitter paper as a mat.  Not sure who these letter stickers are by.


 Lots of sparkle on this one!!  Used my Cropidile to punch different size circles out of the sparkle duct tape.  A doilie sprayed with Black Color Shine and Gold Lame splatter.  Teresa Collins chip boaard sticker and some Pink Paislee color border that was cut apart and sparkled.  Basic Grey chipboard letter stickers.


Athens is a very simple page.  Cut aparts, Teresa Collins stickers, a chip board border and Pink Paislee color border.  Block letters and some dimensional adhesive. One gold sequin star to finish it off.


Another quickie: the 6x6 paper, Basic Grey letters, punched sparkle duct tape, and more Teresa Collins border stickers


In Izmir I love the photo mat with the striped paper.  More of the gold duct tape, some fussy cutting one of the 6x6 papers, and gold lame/ black color shine splatter.  What you cant see in the pic is that it goes off the page to create a tab on the outside of the book.
 Ephesus was one of my absolute favorite places on our trip.  I also like how this one turned out.  This 6x6 paper is so versatile!  Cut more apart, used some Basic Grey letter stickers and more gold lame Color shine splatter.  The stars are from a Dollar Store corner punch that has been awesome to make star splatters because they are so small.  A black photo corner and more gold duct tape.  Again, it goes off the page to create a tab.


Another fairly simple and easy page.   Border stickers, 6x6 paper cut outs, gold duct tape, and Color shine splatter.  The letters are Simple Stories but I painted them with gold glitter paint so they have a red tinge under the gold.


Hagia Sophia was an amazing building so I wanted a simplistic page.  There is a heart on Turkey on the world map tag.  Cut out some glitter paper and circle punch cut outs. A couple of photo corners and black/gold lame Color Shine splatter.


So I wanted to make this one a little different because it was my favorite place on our trip.  The paper is Teressa Collins, but there is a vellum bag with gold dots cut apart used as a matte.  More glitter paper cut in various sizes of circles and black/gold lame Color Shine.  More Basic Grey letter stickers and a cool paper clip from Staples spray painted gold finishes the page.
On this page I used the 6x6 paper again, Basic Grey bitty
letter stickers, Color shine splatter, and punched glitter duct
tape. Simple, but I really like hot it turned out (and try to say
the name of the town!)
Lots of layered 6x6 papers cut into banners.  I am
unsure who these letter stickers are.  You can see
that I am not the best stamper in the world, but I like
the messy unperfect look of the stamping.